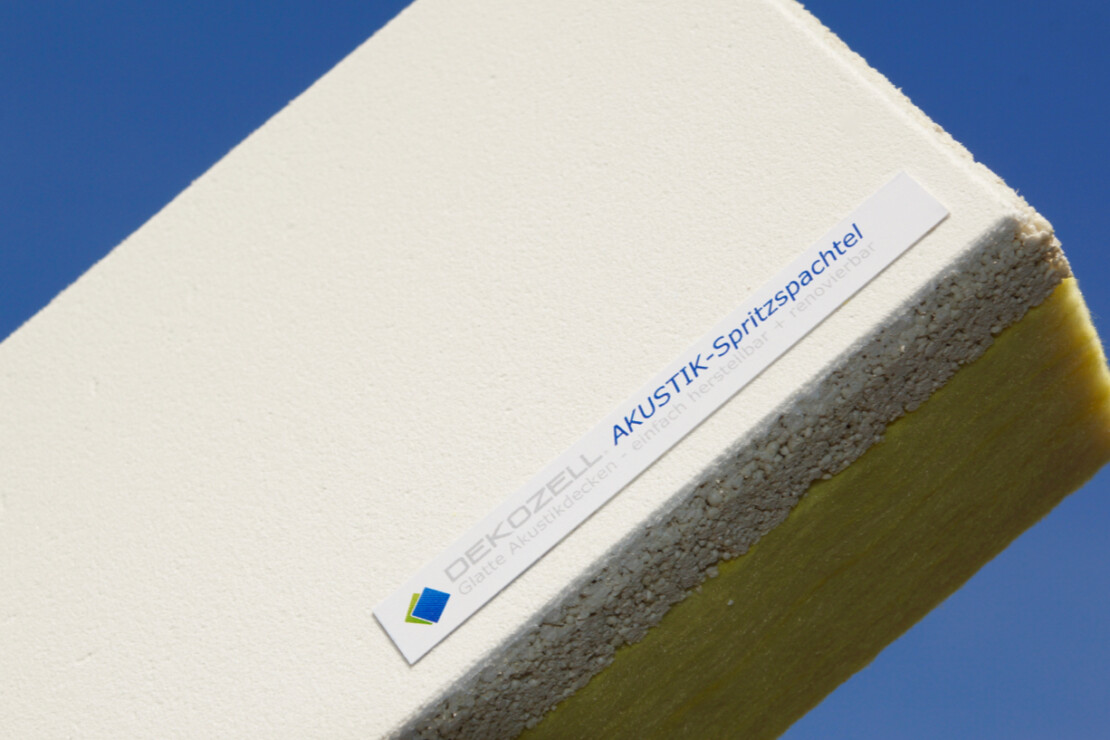
DEKOZELL®
Verarbeitung des DEKOZELL Akustikputz Systems „ROBUST“ mit DEKOZELL Akustikputz als fugenlose Schlussbeschichtung
Schritt
Foto
Beschreibung
Die Untergründe müssen grundsätzlich eben sein und eine Tragfähigkeit von mindestens 15kg/m² aufweisen. Zur Einstellung der Saugfähigkeit die Untergründe grundsätzlich immer mit DEKOZELL Akustik-System-Tiefengrund vorgrundieren.
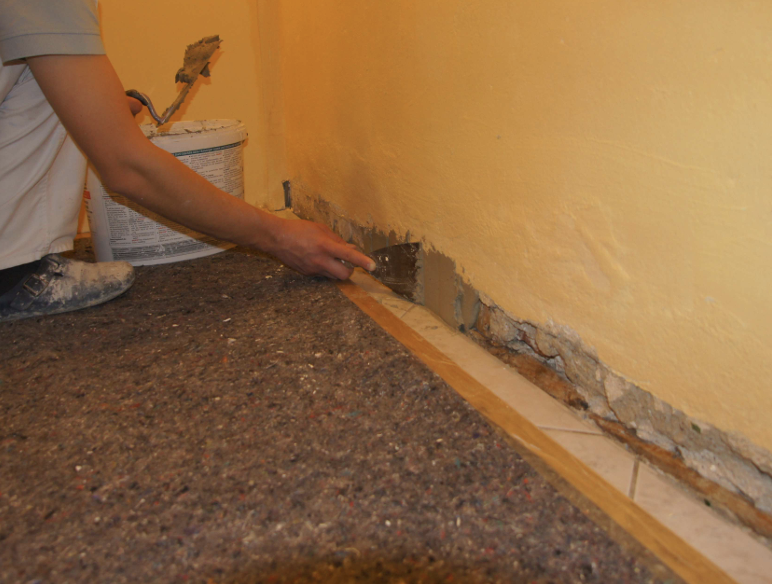
Der DEKOZELL Akustik-System-Mineralkleber kann bei Bedarf auch zum Spachteln von Putzausbrüchen oder Unebenheiten verwendet werden – nachdem diese mit DEKOZELL Tiefegrund vorbehandelt worden sind.
Der Mineralkleber ist auf Zementbasis mit Kunststoffvergütungs-Zusätzen. Offenzeit 30 Minuten.

Den Mineralkleber mit einer 6er-Zahnkelle auf die Plattenseite auftragen. Achtung: Kleber auf die Plattenseite auftragen, auf welcher sich die umlaufende Phase befindet!
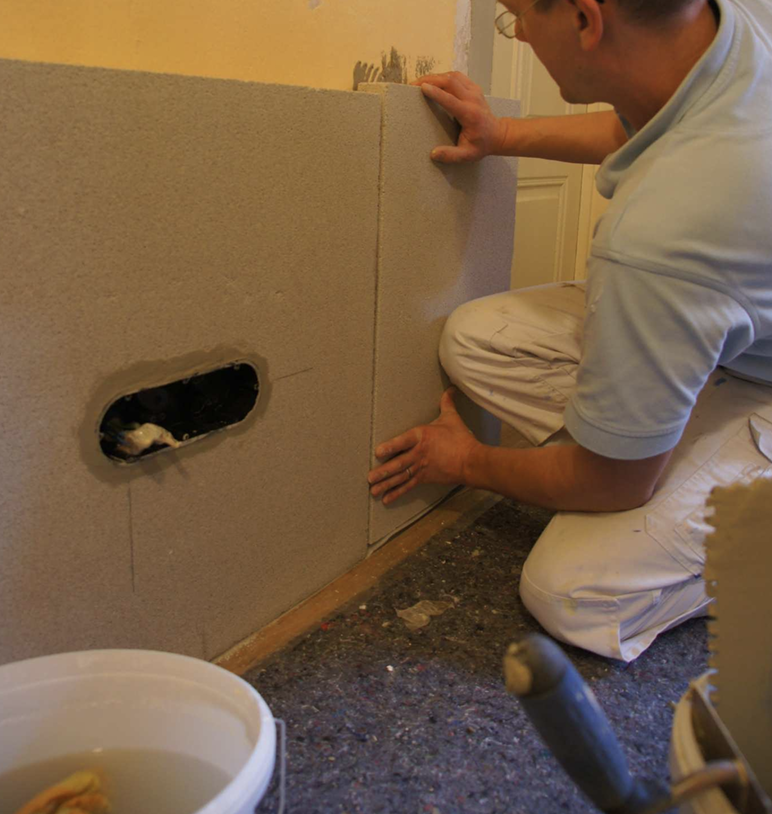
Platte ansetzen und in Position einschieben.
- NICHT einschlagen, nur schieben!
- Plattenstöße NICHT mit verkleben (es könnte dabei Kleber auf die Vorderseite der Platten gelangen und diese Bereiche unnötig akustisch versiegeln)
- Sauber Arbeiten, damit kein Kleber auf die Vorderseiten gelangt
- Platten vollflächig bündig verkleben (u.a. zur Vermeidung von KondensatAnsammlungen durch Wärmebrücken, ähnlich wie bei diffusionsoffenen Innenwärmedämmungen)
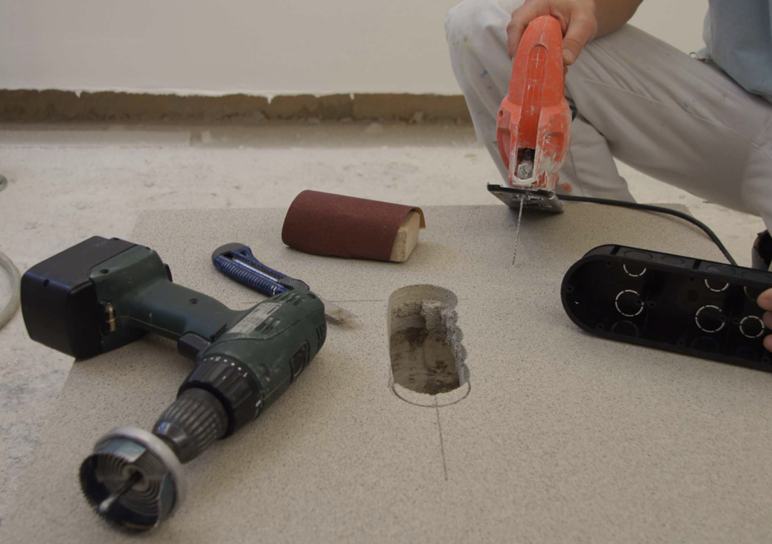
Die Platten lassen sich mit herkömmlichen Werkzeugen sehr gut zuschneiden und bearbeiten. Eine Japan-Säge empfiehlt sich für fast staubfreie Schnitte mit hoher Präzision. Stichsäge, Lochsäge und Cutter-Messer sind ebenfalls mögliche Schneidwerkzeuge. Auch auf einer Kreissäge mit normalem Wechselzahl-Sägeblatt sind sehr effiziente Schnitte möglich.
Einsätze für Steckdosen, Schalter oder Einbauspots mit dem DEKOZELL Mineralkleber in den Plattenauschnitten fixieren.
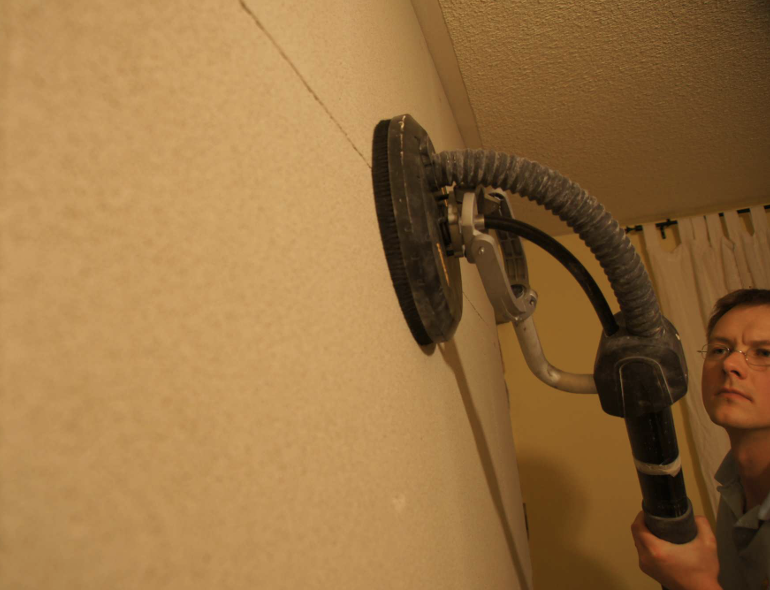
Ausgleich von eventuellem Versatz bei den Platten nach dem Verkleben durch Schleifen möglich. 40er Schleifkorn verwenden, damit kein feiner Schleifstaub entsteht, der die Akustikporen der Platte versiegeln würde. Unbedingt Schleifgerät mit Absaugung verwenden, damit der Schleifstaub nicht in die Platte geht und diese damit akustisch versiegelt. Statt Schleifgiraffe wäre auch der feiner zu führende Mirka Exzenter-Schleifer CEROS 6505 eine Alternative zum Schleifen der Platten. Zum Schleifen & „Fühlen“ der Plattenversätze besser dünne Handschuhe verwenden. Die Glaskugeln der Platte zerreiben schnell die Haut der Fingerkuppen!
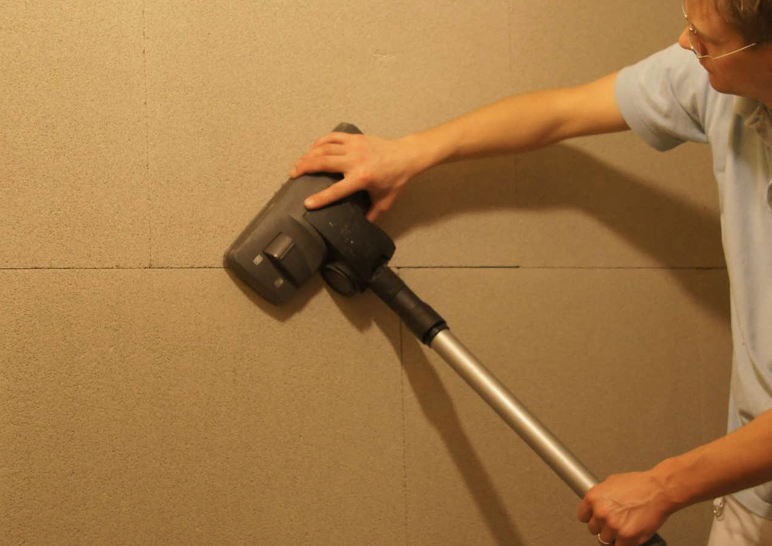
Um Staub und lose Glasgranulat-Kugeln zu entfernen, die komplette Fläche absaugen.
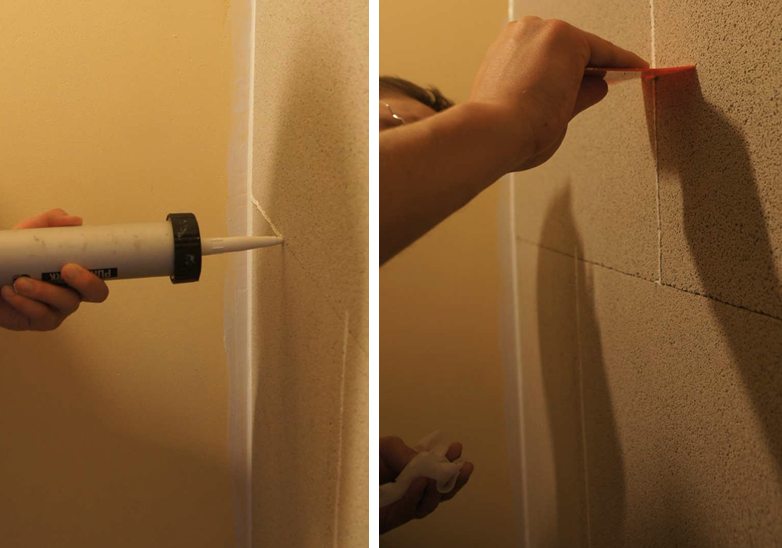
In die Platten-Fugen mit sehr sparsamen Materialeinsatz DEKOZELL Hybrid-Polymer einbringen und dieses bündig abziehen mit einem Japan-Spachtel. Die Fugenbreite des Polymers so schmal wie möglich halten, da diese Bereiche akustisch versiegelt werden und keinen Schall mehr absorbieren können.
Auch den Randanschluss der Platten an benachbarte Wände bzw. im Decken-Ixel mit dem Polymer ausführen, hier (wie auch bei Silikonfugen üblich) als Kehlnaht abziehen.
Das Polymer lässt sich ähnlich wie Silikon verarbeiten. Das Seifenwasser muss man deutlich stärker konzentriert mischen als bei Silikon üblich.
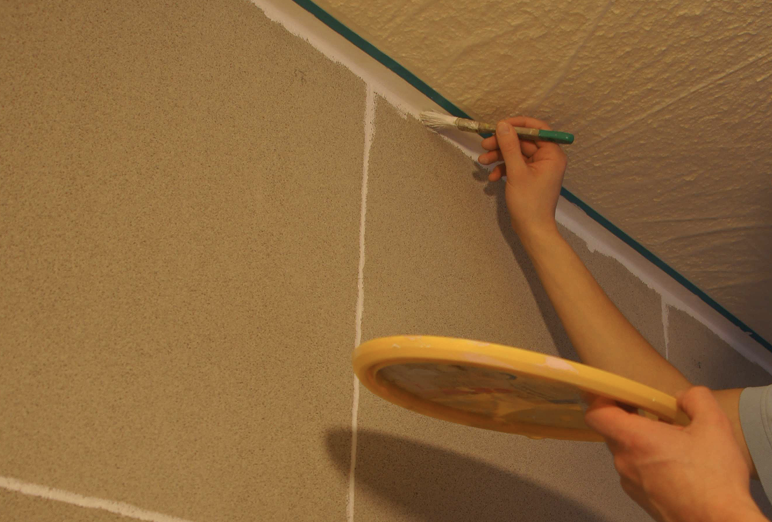
Das Polymer bildet eine glatte Oberfläche bei der Trocknung. DEKOZELL benötigt jedoch immer einen rauen Untergrund zur Haftung. In den Randbereichen der Akustikfläche das Polymer daher mit einer pigmentierten Quarzhaftbrücke (Sto PrepIn) überstreichen. Innerhalb der AkustikFläche muss die Haftbrücke nur bei größeren Spachtelstellen aus Polymer aufgestrichen werden.
Das Polymer ist bei Bedarf bereits in nassem Zustand überstreichbar. Es benötigt ohnehin Feuchtigkeit zur Aushärtung.

-> siehe Anleitung „DEKOZELL Anrühren und Einfärben“
-> siehe Anleitung „Verarbeitung mit Inomat M8“
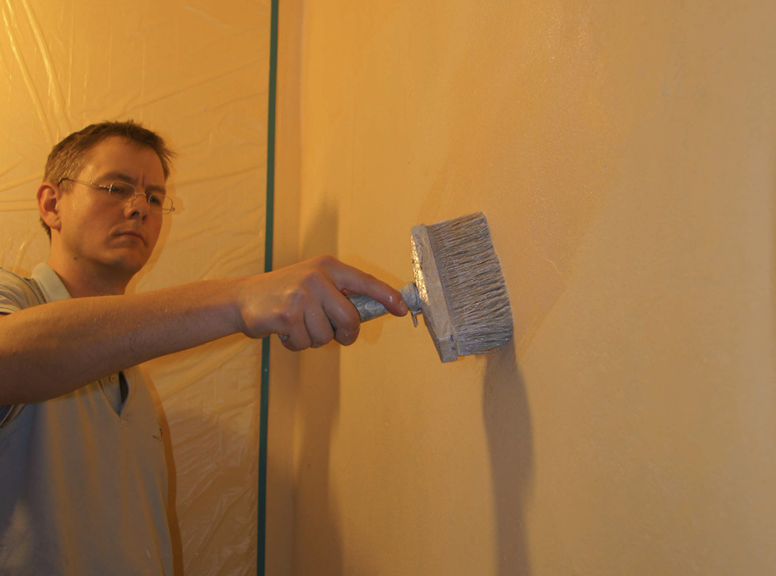
DEKOZELL wie in den beiden genannten Anleitung anmischen und Inomat M8 spritzbereit einstellen.
Mit feinem Sprühbild Material satt Aufspritzen in kreisenden Bewegungen. Sprühbild so einstellen, daß keine Krater beim Spritzen entstehen und möglichst keine Lufteinschlüsse in der aufgespritzten Beschichtung.
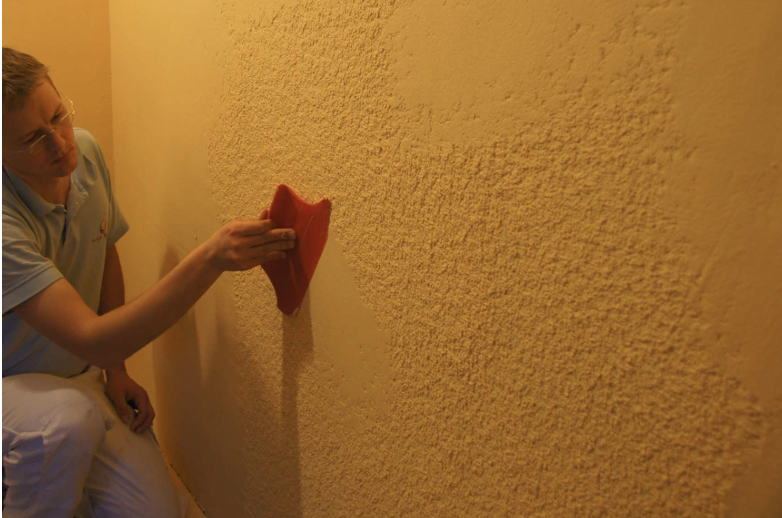
Die erste Lage DEKOZELL mit dem PajaritoSpachtel Nr. 958 nach dem Aufspritzen Zwischenglätten. Die Offenzeit des Putzes beträgt mehrere Stunden, was ein entspanntes Arbeiten sichert.
Anschließend kommt noch eine zweite Lage DEKOZELL aufgespritzt. Die zwei Lagen Nass-inNass und OHNE Zwischentrocknung Spritzen!
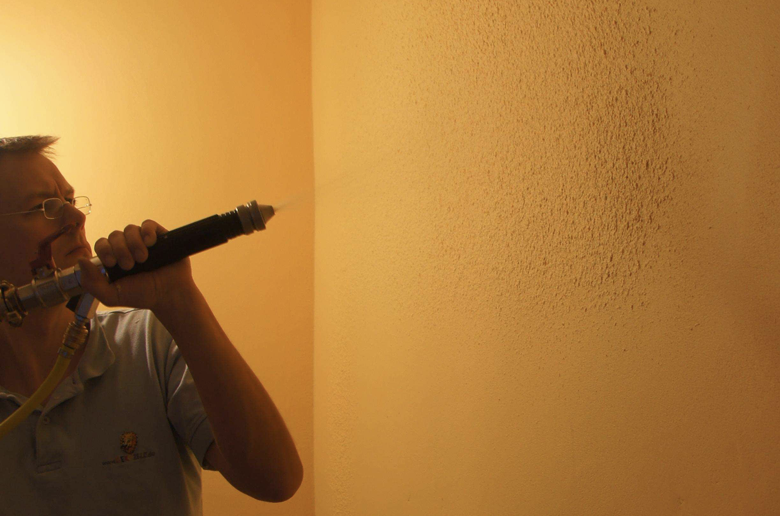
Bild Mirka CEROS 650-5 einfügen.
Wenn die Oberfläche zum Schluss strukturiert stehen bleiben soll, wird das Sprühbild für diese zweite Schicht eher ein wenig gröber eingestellt. Luft und Materialmenge so einstellen, dass keine Krater im Moment des Aufspritzens des Materials enstehen. Diese Krater kommen sonst bei der Trocknung alle wieder durch!
Wird als Endbeschichtung eine geglättete Oberfläche gewünscht, wieder ein eher feines Sprühbild einstellen und das Material mit möglichst wenig Lufteinschlüssen aufspritzen. Wird die glatte Oberfläche gewünscht, ist nach dem Aufspritzen natürlich nochmals eine Glättung mit dem Pajarito-Spachtel nur. 958 nötig.
Achtung: Die geglätteten Oberflächen empfehlen wir nur in Farbton Weiß zu machen!
Die geglättete Oberfläche bildet während der Trocknung eine lederartige Maserung aus, die sich unterschiedlich stark ausbildet in verschiedenen Bereichen. Zum Teil erkennt man diese Maserung („Baby-Elefantenhaut“) schon während der Glättung. Bei Farbton Weiß kann man diese Maserung nach dem Trocknen noch durch Schleifen in eine glatte samtartige Oberfläche umwandeln. Das Schleifen ist relativ zeitintensiv. Wir empfehlen den Mirka-LeichtExzenterschleifer CEROS 650-5 mit 52 Absauglöchern auf 150mm Tellerdurchmesser sowie das Mirka Schleifgitter 320er Körnung zum Schleifen des DEKOZELL. Wenn der Schleifstaub nicht sofort abtransportiert wird, bilden sich Faserknoten und damit Riefen im Schleifbild – daher der Mirka-Exzenter-Schleifer mit den 52 Absauglöchern und das feine Schleifgitter als Empfehlung.
WAS SIE WIRKLICH WOLLEN. BESSER DENN JE.
Wir geben alles für Ihr glattes Ergebnis.
Fugenlose Akustikputz-Systeme sind immer noch ein Nischen-Produkt. Aber eines, das wir leben und lieben. Wir haben uns darauf spezialisiert, sind richtig gut und machen das mit Begeisterung. Und bieten Ihnen und Ihrem Team die nötige Expertise, Leistung und Flexibilität, um Ihre Jobs zu erledigen. In kleinen wie in großen Projekten.


Lassen Sie sich überzeugen
und begeistern.

Lassen Sie sich beraten
Sprechen Sie mit unseren Dekozell Spezialisten. Wir machen „nur“ fugenlose Akustikputz-Systeme, das aber einzigartig gut und mit Begeisterung. Und wir legen uns ins Zeug für Sie, um die beste Lösung für Ihr Projekt zu finden.
Kostenfreies Muster anfordern
Nur Ihre fachliche Bewertung entscheidet. Fordern Sie daher Ihr Produktmuster bei uns an und nehmen Sie die Dekozell Qualitätsprüfung persönlich in die Hand. Wir sorgen dafür, dass Sie Ihr Muster schnellstmöglich geliefert bekommen.